> ## Documentation Index
> Fetch the complete documentation index at: https://docs.3dpreppro.com/llms.txt
> Use this file to discover all available pages before exploring further.
# Lattice Infill
> Generate internal structures to strengthen and lighten your model
Lattice Infill fills the interior of your model with a repeating geometric structure. This reduces material while maintaining strength — and can create stunning visual effects for display models.
## When to use this
* For artistic lattice effects on display models
* When you need precise control over internal structure
* To reduce material usage while keeping strength
* For models where you want the lattice to be visible
## Lattice patterns
| Pattern | Style | Description |
| -------------------- | -------------- | ---------------------------------------------------------------------------------- |
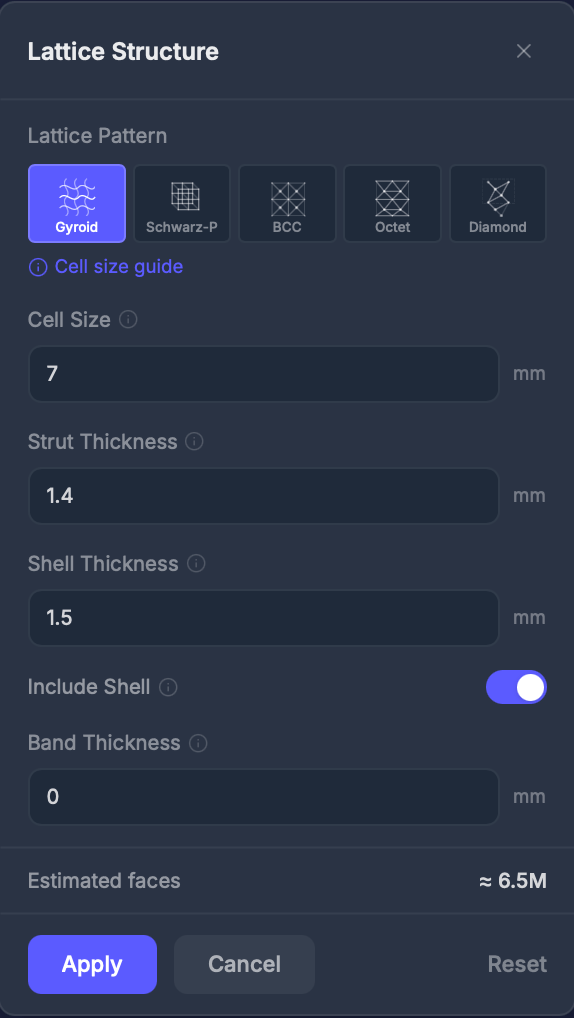
| **Gyroid** (default) | Smooth surface | Continuously curved surface. Beautiful organic look, excellent strength-to-weight. |
| **Schwarz-P** | Smooth surface | TPMS nested-cube look. Strong under compression; not self-supporting in FDM. |
| **BCC** | Strut-based | Body-centered cubic with diagonal struts. Strong and efficient. |
| **Octet** | Strut-based | Dense network of struts. Very strong, uses more material. |
| **Diamond** | Strut-based | Tetrahedral connections. Organic, crystal-like appearance. |
 ## The result
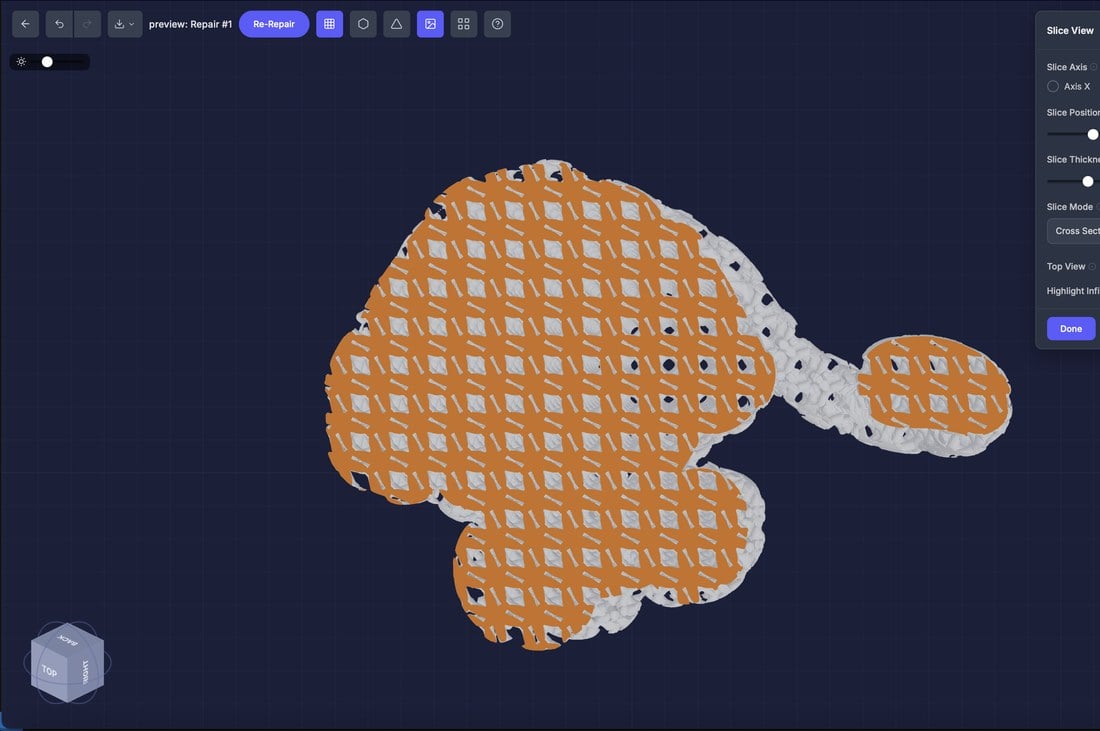
Applying a lattice replaces the model's solid interior with the pattern you chose, while keeping the outer shape intact. The exterior looks like a normal print; slice into it to see the repeating structure inside.
## The result
Applying a lattice replaces the model's solid interior with the pattern you chose, while keeping the outer shape intact. The exterior looks like a normal print; slice into it to see the repeating structure inside.
 ## Settings
### Cell size (mm)
The size of each repeating unit. **Smaller = denser lattice.** Default: 5 mm.
### Strut thickness (mm)
Diameter of the connecting struts. Only for BCC, Octet, and Diamond. Default: 0.5 mm.
### Shell thickness (mm)
Wall thickness of the outer shell — and, for the Gyroid and Schwarz-P surfaces, the TPMS surface band. Default: 1.0 mm.
### Interior offset (mm)
Shown only when **Include shell** is off. Shrink or expand the open-cell lattice region relative to the model surface. Positive = shrink inward (leaves a gap). Negative = expand outward past the surface. Default: 1.0 mm — but when you turn Include shell off, this auto-sets to -1 mm to extend the lattice out to the surface. With Include shell on, the lattice domain is automatically eroded by the wall thickness, so this control is hidden.
### Include shell
Toggle (default: on). Keeps the outer surface of your model intact around the lattice.
### Band thickness (Fill Mode)
Controls how much of the interior the lattice fills. Default: 0 = fill the entire interior. Set a value greater than 0 (typically 3–6 mm) to fill only a band just inside the shell — faster and lighter, leaving the body hollow inside.
## Step by step
Click **Lattice** in the Interactive Tools section.
Click one of the five pattern tiles.
Smaller cells = denser, stronger lattice. Larger cells = lighter, more open.
Adjust strut thickness (strut patterns) or shell thickness (Gyroid).
Click **Apply** to generate the lattice.
## Tips
* **Gyroid** is the most popular choice — strong, beautiful, and prints reliably
* Cell sizes below **3 mm** may be too fine for FDM printers
* Use interior offset to prevent the lattice from touching the outer surface
* Use the [Slice View](/editor/tools/slice-view) tool to inspect the lattice interior
Very small cell sizes with thick struts create extremely dense lattices that take a long time to process and produce very large files.
## Settings
### Cell size (mm)
The size of each repeating unit. **Smaller = denser lattice.** Default: 5 mm.
### Strut thickness (mm)
Diameter of the connecting struts. Only for BCC, Octet, and Diamond. Default: 0.5 mm.
### Shell thickness (mm)
Wall thickness of the outer shell — and, for the Gyroid and Schwarz-P surfaces, the TPMS surface band. Default: 1.0 mm.
### Interior offset (mm)
Shown only when **Include shell** is off. Shrink or expand the open-cell lattice region relative to the model surface. Positive = shrink inward (leaves a gap). Negative = expand outward past the surface. Default: 1.0 mm — but when you turn Include shell off, this auto-sets to -1 mm to extend the lattice out to the surface. With Include shell on, the lattice domain is automatically eroded by the wall thickness, so this control is hidden.
### Include shell
Toggle (default: on). Keeps the outer surface of your model intact around the lattice.
### Band thickness (Fill Mode)
Controls how much of the interior the lattice fills. Default: 0 = fill the entire interior. Set a value greater than 0 (typically 3–6 mm) to fill only a band just inside the shell — faster and lighter, leaving the body hollow inside.
## Step by step
Click **Lattice** in the Interactive Tools section.
Click one of the five pattern tiles.
Smaller cells = denser, stronger lattice. Larger cells = lighter, more open.
Adjust strut thickness (strut patterns) or shell thickness (Gyroid).
Click **Apply** to generate the lattice.
## Tips
* **Gyroid** is the most popular choice — strong, beautiful, and prints reliably
* Cell sizes below **3 mm** may be too fine for FDM printers
* Use interior offset to prevent the lattice from touching the outer surface
* Use the [Slice View](/editor/tools/slice-view) tool to inspect the lattice interior
Very small cell sizes with thick struts create extremely dense lattices that take a long time to process and produce very large files.